Smartie Cookies

smartie cookie

Who hasn’t been coerced to buy these beauties in the supermarket for wide-eyed children….or, indeed, just for yourself?  Well, now you can bake them at home!  Easy to do and, if they don’t eat them all first, the kids can help put the Smarties on the top.  I actually preferred them the day after I made them, they were slightly chewier, but that’s just down to personal preference.  My kids loved them both days; ‘Mummy!  They’re just like the ones at Waitrose!’.  Job done.

smartie cookies emma bridgewater plate

You will need…

  • 350g  plain flour
  • 1tsp bicarbonate of soda
  • ½ tsp baking powder
  • ¼ tsp salt
  • 250g soft butter
  • 250g sugar
  • 1 large egg, beaten
  • 5ml vanilla extract
  • 2 tubes smarties (150g)

Sift dry ingredients into a bowl and put to one side. Then (preferably in a mixer) cream together the butter and sugar until pale and fluffy.  Add the egg and vanilla extract and mix.  Then slowly beat in sifted dry ingredients to form a stiff dough. By hand, stir in one tube of Smarties. Roll dough into  balls about the size of a ping pong ball and place on baking trays lined with parchment paper. Leave plenty of room between each ball as they spread!  Adorn the top of each ball with three or four  more Smarties and bake at 190ºC (170º fan) for 12 to 15 minutes until pale golden brown. When you remove them from the oven, leave on the trays for a couple of minutes before transferring to cooling racks to cool completely. Store in airtight tins.

Yum

Eggs in Purgatory

Nigella Lawson, you are truly wonderful.  Having seen you make Eggs in Purgatory on ep.1 of Nigellissima I then laughed so much at your preamble in the book, I had to read it out to my OH.  Then, this morning, I made it (and I don’t even have a hangover).

O.M.G.

If Greg Wallace likes his chilli kick, then this is the dish for him.  It was heavenly (literally).  And I almost want to get a bit drunk tonight just so I can eat it again tomorrow and try out its hangover curing possibilities*.

For those of you who have NO idea what I am going on about, Eggs in Purgatory is (in my opinion) a kind of mix between bloody mary and raw egg hangover cure, but very delicious as a dish on its own.  My OH screwed his nose up when I told him what was in it, but looks can be very deceptive….

And all you need can be found in the cupboard! Garlic, chilli flakes and a tin of chopped tomatoes!

Eggs in PurgatoryDrop in an egg and grate about 3 teaspoons of parmesan over the top.  Cover and cook for about 5 mins.

Sprinkle over a little more parmesan and serve with toast/crusty bread.  I served it straight from the pan (Philistine) and so I could just dig in with the bread. Well, nobody was looking….

The eggs might be in purgatory but they are definitely in a place that is divine.


* I did

Yum

Nigellissima

nigellissima nigella lawsonNow, the name of my blog might have led you to believe I am a bit of a Nigella fan.  And you’d be right.  So have pre-ordered the new book I was equally excited to see the first programme in the new series, Nigellissima.  There are two reasons for this.  One; it’s Nigella.  Two; Italy.  I love everything about Italy; the people, the food, the culture, the architecture, the language and, of course, the wine.  Give me homemade pasta and a bottle of Gavi di gavi and I’m happy.

Nigella, of course, did not disappoint.  Settled in her to die for kitchen (I actually squeaked out loud at one point) the gorgeous Ms Lawson showed me how to make lots of things that had to be ‘strewn’ or ‘ooze’ and they all looked utterly delicious.  Even the steak and I’m a vegetarian.  It is her commentary that I love the most.  She speaks with onomatopoeic eloquence and makes me chuckle away on the sofa prompting quizzical looks from my OH.

I also share her love of kitsch and, seemingly, kitchenware.  I did, at one point, turn to OH and say ‘You see?  I should be friends with Nigella!  We have the same water decanter, same melamine cups for the kids, a kitchenaid and I have twinkle lights in the garden all year ’round like her’.  We could be BFFs……*dreams*

Anyway, suffice to say if you can take on board another cooking programme from the plethora that are filling our screens at the moment, then tune in.

I, for one, am planning on cooking italian this weekend…


Macmillan Coffee Morning

nigella chocolate cake

I am joining in with a linky, Foto Friday, which requires a photograph of something you’ve cooked/baked this week.

I spent most of yesterday evening baking cakes for the Macmillan Coffee morning today.  Do click on the link and see what it’s all about – a great cause.

This is my Nigella chocolate cake…hope it tasted good!  I had a hell of a job keeping it safe from my 5 year old son – so much so, that I have promised to make one for him this weekend.  Ah well, you can never have too much cake.*

The Crazy Kitchen

*Alas, this is not true.


To support and spread the word about the Macmillan Coffee Morning rate how you like your coffee on the widget below. After choosing entering your answers, you will then be given a coffee character which can then be shared through twitter. The tweet will have the #coffeemorning to help promote the event.


Olive Sticks

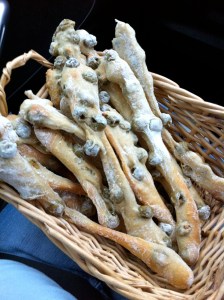
This is a recipe from Paul Hollywood’s new book ‘How to Bake’ which, by the way, is really good!  Every recipe I have tried so far has been spot on and in it lies the best lemon drizzle cake I have ever baked (saving that for another day).  However, I have been wooing my friends with these olive sticks, which look a bit odd (at a friend’s party I heard them referred to as ‘dog chews’.  She nearly got a poke in the eye from one….grr).  However, they taste lovely especially when dipped in some oil/balsamic.

olive sticks paul hollywood

The dough is really wet, so don’t be put off by it, but persevere.  You will need a mixer/kitchenaid for this recipe.

So, put 500g of strong white flour in a bowl and on opposite sides, 10 g of fast-action yeast and 10 g of salt.  Mix on a slow speed and gradually pour in 300 ml tepid water.  When the dough starts to come together add a further 100 ml of tepid water.  Using my kitchenaid, I mix for 5 mins on a slow/medium speed (no 3).  The dough should become wet and stretchy.  Then add 2 tbsp of olive oil and mix for another 2 minutes.  In my experience it now becomes very odd and flaps around the bowl, but don’t fret!

Drain a large jar of pitted green olives and add to the dough mixing slowly until they are well distributed.  Sort of.  Then put the whole lot into an oiled tub, clingfilm and leave for at least an hour until the dough has tripled in size.

While you are waiting line 3/4 baking trays with baking parchment and heavily flour the work surface and add a shake of semolina too, if you have some.

paul hollywood olive sticksTip the dough gently on to the floured surface and flour the top of the dough too.  Gently as you can, stretch the dough into a vague rectangle and then cut it into about 3cm strips.  I usually end up with 15.  Carefully transport each strip onto the baking trays, stretching it out to about 20cm.  Cover loosely with a plastic bag (or I stick two trays into a bin liner which works well) and leave to prove for 30 mins.  Meanwhile, preheat the oven to 200ºC.  Bake for 10-15 minutes until lightly golden and cool on a wire rack.  You may need to test one while they are still warm….just to make sure ;)

I have tied some with raffia and taken them to friends’ for drinks and nibbles or even presented the whole lot in a basket.  But usually, we just scoff the lot at home.  They are very moorish.  I did try them with black olives, but I think they are much nicer with green.  When I am feeling flush I might buy some better quality olives and see if it makes a difference..

Do try these – they are relatively quick and easy to make and are just soooo nice.  Well, if you like olives.

Yum

Hummingbird Cake

I was introduced to this cake at my favourite cafe, The Black Dog.  I had it there for the first time and was extolling its virtues to the waitress who duly fetched the recipe book they used and I was straight on to my Amazon app and ordering the book.  It is from the Hummingbird Bakery, but despite the shared name, it is a widely known cake and not invented by them.  It is supposed to be a triple layer cake, but I chickened out and went for two layers as my last attempt at 3 layers looked like an homage to the Leaning Tower of Pisa.  This meant the baking time was longer, but it turned out well enough!

hummingbird cake

The bananas keep it moist and it has a lovely moorish flavour.  Initially, I wouldn’t believe that there was pineapple in it (convinced it was apple) but I was proved wrong and it all works very well together.  Unfortunately, I ran out of pecans, so the decoration is a bit sparse but it is definitely a cake worth baking.  And eating.  I might try it as muffins too….

You will need:

300g caster sugar

3 eggs

300ml sunflower oil

270g peeled bananas

1tsp ground cinnamon

300g plain flour

1tsp bicarb soda

½tsp salt

¼tsp vanilla extract

100g tinned pineapple, chopped up small

100f shelled, chopped pecans

 and for the icing:

600g sifted icing sugar

100g unsalted butter

250g cream cheese


Put the sugar, eggs, bananas, oil and cinnamon into a mixer and combine well.  Add the flour, bicarb, salt and vanilla and mix again until the batter is smooth.  By hand, stir in the nuts and pineapple then split the mixture into two lined cake tins and bake at 170ºC for about 40 mins (but start checking after 30 mins).

Let the sponges cool in their tins for a few minutes then turn out on to a wire rack to cool completely.  I always put mine on upside down so the domed top is flattened more and it makes it easier to construct the cake.

Whilst the sponges are cooling make the icing by combining the sifted icing sugar (don’t skip the sifting – it leaves lumps in the icing.   I know from experience!) and the butter in a mixer then beating in the cream cheese and mixing for 4/5 minutes until smooth and light.

hummingbird cakeWhen cool, put one sponge on a cake stand and slot greaseproof paper under the edges.  These are removed after icing and keeps the stand clean.  Splodge about ¼ of the icing onto the sponge and spread over evenly.  Put the other sponge on top and repeat.  Use the rest of the icing to ice the sides of the cake, covering the sponge completely.  I always make a mess of this, but using a palette knife helps to spread evenly and without digging in to the cake!

Decorate the top with a dusting of cinnamon and pecan halves.  Then serve (do you like my new Emma Bridgewater comport?) with a cup of tea and enjoy!  Even my kids ate it, which is always a test of greatness – fussy little monkeys.  Just don’t count the calories….

Yum